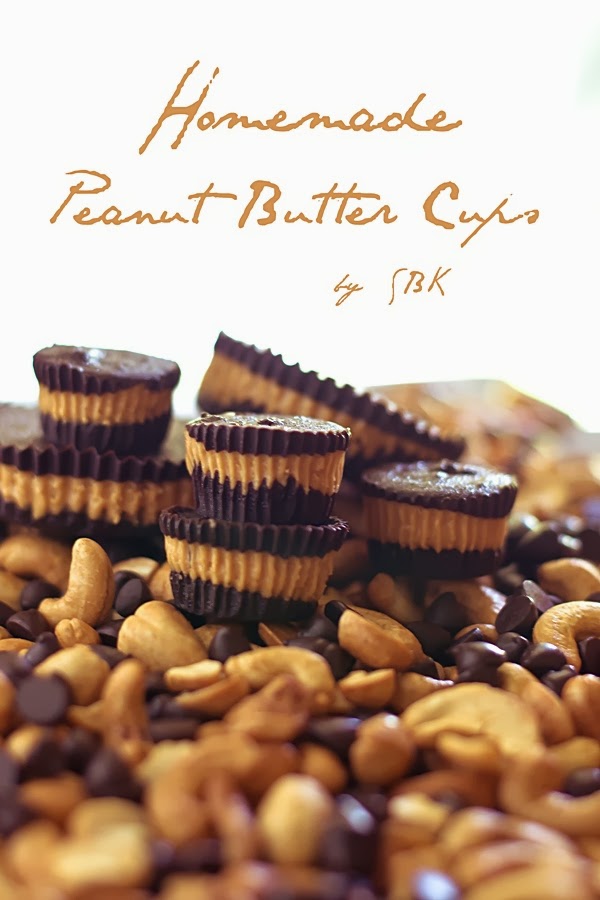
Thursday, February 28, 2013

~ Red Velvet Cupcake Recipe...

Sheery Dream Cakes | 1:36 PM | | 18 Comments so far
Assalamualaikum dan Salam Sejahtera... 

Apa khabar hari ini? Doa dan harapan Diana moga semuanya di dalam keadaan sihat sejahtera hendaknya ya.. Sekarang ini musim demam + batuk + selsema di sini.. Diana pun baru sahaja sembuh beberapa hari ini... Ok lah.. Apa kata kita cerita pula tentang Red Velvet Cupcake ini..


Pada mulanya Diana tidak mahu kongsikannya di sini sebab tersilap bubuh pewarna merah jambu.. Cuai sangat semasa bubuh warna tu.. Tercapai pula warna lain.. Adeeh.. Jadi Diana tambah sedikit pewarna merah.. Macam ini lah kejadiannya cc yang Diana buat... Hehhehee... Tapi apa yang lebih penting rasanya tidak terjejaskan kan.. Nasib baik.. Hihiii... Lepas tu bila dah cuai macam ini.. Timbul pula rasa malas nak ambil gambarnya... Hanya main letak kat tepi pintu dapur dan ambil gambarnya.. :D. Akhirnya kongsikan jugalah di sini.. :). Resipinya Diana ikut dari blog Sugar & Snapshots.. Buat Sugar & Snapshots.. Izinkan Diana kongsikannya di sini ya.. TQ..


:: Resipi Oleh ~ Sugar & Snapshots  ( TQ ) 

RED VELVET CUPCAKE  
Yield : about 24 cupcakes

Ingredients
  • 2 cups cake flour ( sifted )
  • 1/2 cup all purpose flour
  • 3 tbsp red alkalized cocoa powder _ Diana guna serbuk koko biasa
  • 1 tsp salt
  • 1 1/2 cups sugar
  • 1 1/2 cups vegetable oil
  • 2 large eggs plus one egg yolk ( room temp )
  • 3 drops of red gel-paste food coloring
  • 2 tsp vanilla extract
  • 1 cup buttermilk _ ( Homemade : 1 cawan susu + 1 tbsp cuka putih / jus lemon. Rehatkan selama 20 minit )
  • 1 1/2 tsp baking soda
  • 2 tsp cider vinegar _ Diana guna white vinegar

Instructions
  1. Preheat the oven to 350°F. Prepare your cupcake tins with your favorite cupcake wrappers.
  2. Sift your flours, cocoa and salt together into bowl or onto some parchment paper and set aside.
  3. With your stand mixer or electric hand-mixer on medium-high, whist the oil and sugar on medium-high speed until they are well combined. 
  4. Add your eggs one at a time to the mixer until each one is mixed in well. Stop and scrape down the sides of the mixing bowl to make sure it's all consistent.
  5. When all of your eggs are in and thoroughly incorporated add your three drops of gel-paste food coloring and the vanilla extract. ( I don't really like to add a lot of coloring and the red alkalized powder does a great job of making these a nice natural looking red but you can add more color as you need to your taste, especially if you're using plain dutch cocoa powder ).
  6. Turn your mixer down to low and carefully add a third of the flour/ cocoa/ salt mix. Add half of the buttermilk and whisk together until just combined.
  7. Add in another third of the flour and combine, then the rest of the buttermilk ( whisking until just combined again ) and then the rest of the flour. Whisk until the last of the flour is just incorporated.
  8. In a small bowl or cup whisk the vinegar and baking soda together ( remember, it will foam up so make sure your container isn't too small ). Add this to the batter and mix on medium speed for about 10 - 12 seconds until it's incorporated.
  9. Fill each muffin cup three-fourths full with batter.
  10. Bake for 20 minutes or so, rotating the pan halfway through to ensure even baking.
  11. When a toothpick in the center comes out clean they're done. Don't over-bake!.
  12. Let them cool completely before frosting ( but it's okay if you want to eat one warm. They're really yummy! )


Untuk frosting, Diana guna Cream Cheese Frosting dari Martha Stewart.


~ Cream Cheese Frosting...

:: Resipi Oleh ~ Martha Stewart ( TQ )

Ingredients
  • 8 ounces cream cheese, room temperature
  • 8 tablespoons unsalted butter, cut into pieces, room temperature _ ( Diana guna Salted butter )
  • 1 cup confectioners' sugar 
  • 1 teaspoon pure vanilla extract _ ( Diana bubuh 1/2 tsp sahaja )

  • Directions

  1. Place cream cheese in a medium mixing bowl. Using a rubber spatula, soften cream cheese. 
  2. Gradually add butter and continue beating until smooth and well blended. 
  3. Sift in confectioners' sugar and continue beating until smooth. 
  4. Add vanilla and stir to combine.


~ Oleh kerana ada komen yang ingin mengetahui bagaimana Diana buat bentuk love tu.. Jadi Diana kongsikan step by step buatnya ya.. Di fb Diana juga sudah ada Diana letak hari itu... Gambar yang sama juga sebenarnya... Ambil guna ipad sahaja ya :)


  • No : 1 ~ Buat lubang berbentuk segitiga di tengah- tengah cupcake kemudian bubuh fillingnya.
  • No : 2 ~ Tutupkan semula dengan potongan kek tadi. Pastikan bucu yang tajam di bawah. 
  • No : 3 ~ Tekan sedikit ke dalam. Potong lebihan kek yang di atasnya ( boleh juga dipotong terlebih dahulu sebelum buat langkah no 2 ini ).
  • No : 4 ~ Letakkan juga lebihan kek pada tempat yang masih nampak krimnya.


  • No : 5 ~ Sapukan krim di atasnya dan hias mengikut citarasa masing-masing.
  • No : 6 ~ Setelah dipotong. 


BACA SELANJUTNYA / READ MORE >>>

Thursday, February 7, 2013

~ Chocolate Peanut Butter Cake...

Sheery Dream Cakes | 10:49 PM | 13 Comments so far
Assalamualaikum dan Salam Sejahtera... 

Siang tadi Diana sempat buat kek coklat di atas permintaan anak bujang Diana.. Dia memang suka makan kek coklat yang ada coklat meleleh tu.. Hehhehee.. Sebenarnya dah beberapa hari dia minta tapi belum ada kesempatan hendak membuatnya.. Jadi hari ini walaupun sedikit sibuk.. Namun bila teringat permintaan anak-anak memang risau tak sudah... Ambil jugalah sedikit masa untuk membuatnya kan..

Walaupun rupa kek ini tidak cantik... Nampak comot gitu ... Namun.. Kek coklat ini memang sangat lembut dan semestinyalah sedap di tekak kami sekeluarga.. Untuk resipi kek coklat.. Diana buat ikut dari resipi blog Sweetapolita... Cuma untuk fillingnya tu Diana tukar mengikut bahan yang ada di rumah ini... Buat Sweetapolita.. Terima kasih kerana sudi berkongsi resipi yang sedap ini dan izinkan Diana kongsikannya di sini pula ya.. TQ..


CHOCOLATE PEANUT BUTTER CAKE  

 Olahan Oleh ~ SBK,Melley Mey's Kitchen @ Sheery Dream Cakes 

:: Resipi Oleh ~ Sweetapolita  ( TQ )

Yield: One 6-layer, 5-inch round cake

( Diana buat 2 kali ganda resipi di bawah ini / 3 lapisan )


Ingredients

For the Cake
  • 1 stick ( 115 g ) unsalted butter, softened
  • 1 1/3 cups ( 300 g ) packed dark brown sugar
  • 2 teaspoons ( 10 ml ) pure vanilla extract _ Diana tidak bubuh sebab esen vanilla tidak tahu letak di mana.. Hehehe
  • 2 eggs, at room temperature
  • 1 cup + 2 tablespoons ( 145 g ) all-purpose flour
  • 1/2 cup ( 60 g ) Dutch-process dark cocoa powder
  • 3/4 teaspoon ( 4 g ) baking powder
  • 3/4 teaspoon ( 6 g ) kosher salt
  • 3/4 cup ( 180 ml ) buttermilk, shaken and warm
  • 1/4 cup ( 60 ml ) coffee or espresso
  • 3 tablespoons ( 45 ml ) mayonnaise
  • 1/3 cup premium dark or extra dark chocolate chips _ Diana gantikan dengan dark chocolate
  • 3/4 teaspoon baking soda
  • 2 teaspoons ( 10 ml ) white vinegar

Instructions
  1. Preheat oven to 350°F. Butter three 5-inch round cake pans, line with parchment rounds, and dust with flour, tapping out the excess.
  2. In a stand mixer fitted with the paddle attachment, beat the butter, brown sugar and vanilla on medium-high speed until lighter in color and slightly increased in volume, about 5 minutes. Lower the speed to medium and add the eggs, one at a time, mixing until each is fully incorporated before adding the next.
  3. Sift the flour, cocoa powder and baking powder into a medium bowl. Add the salt to the dry ingredients after sifting, and whisk dry ingredients.
  4. In a small bowl or measuring cup, combine the coffee and buttermilk. Alternate dry ingredients and buttermilk mixture into creamed mixture, beginning and ending with dry ingredients. Mix until just incorporated, then fold mayonnaise into batter with a whisk, until just blended. Fold in chocolate chips. In a small bowl, combine the vinegar and baking soda ( it will foam ) and quickly add to batter, mixing until just combined.
  5. Divide the batter evenly between the prepared pans. If possible, weigh the batter in each cake pan for 275 g each ( excluding the pans--you will want to tare the scale each time.) This ensures even layers. Smooth with small offset palette knife, and bake for about 25 minutes, rotating once after 20 minutes. Cake is done when toothpick or skewer comes out clean. Try not to over-bake.
  6. Let pans cool on wire rack for 20 minutes, then invert cakes onto racks, gently, peeling away parchment rounds. Let cool completely.

For the Chocolate Glaze
  • 6 oz ( 180 g ) premium dark or extra dark chocolate, chopped
  • 1 stick ( 115 g ) unsalted butter
  • 1 tablespoon ( 15 ml ) light corn syrup _ Diana gantikan dengan Golden syrup
  • Splash of liqueur of choice, optional ( grand marnier, spiced rum, kahlua, etc. ) _ Diana tidak bubuh
  • Pinch of sea salt ( regular salt, if necessary )


Instructions
  1. Place the chocolate, butter and corn syrup in a medium heatproof bowl over a pot of simmering ( not boiling ) water. 
  2. Stir the mixture using a rubber spatula until melted and smooth. 
  3. Remove from heat and stir in liqueur and salt.


Untuk Peanut Butter Cream... Resipi Oleh ~ Sky Blue's Kitchen

Bahan-Bahan
  • 375 gm fresh cream / Non-Dairy whipping cream _ dipukul hingga kental
  • 6 tbsp peanut butter with chocolate stripes _ boleh dikurangkan kepada 4 tbsp / ikut citarasa masing-masing

Cara-Cara
  1. Campurkan keduanya dan gaul menggunakan spatula hingga rata.
  2. Sedia untuk di gunakan.

Cara melapis kek 
  1. Ambil sekeping kek coklat dan sapukan peanut butter cream di atasnya. 
  2. Tuangkan sedikit Chocolate Glaze di atasnya dan lapis dengan sekeping kek coklat lagi.
  3. Ulang langkah di atas sehingga kek dan peanut butter cream habis digunakan.
  4. Letakkan hirisan buah plum / strawberry di atasnya dan tuangkan sedikit Chocolate Glaze.
  5. Tuangkan juga sedikit Chocolate Glaze ketika menghidang.


BACA SELANJUTNYA / READ MORE >>>

~ Peanut Butter Cup Chocolate Cake Recipe...

Sheery Dream Cakes | 8:30 PM | Be the first to comment!
Assalamualaikum dan Salam Sejahtera...

Peanut Butter Cup Chocolate Cheesecake ini sememangnya kek yang sangat berat dan memerlukan banyak masa untuk menyiapkannya.. Dinasihatkan supaya jangan abaikan segala langkah dan arahan membuat kek ini ya.. Sebab kek ini perlu disimpan di dalam freezer sebelum kita dapat sapu frosting nya.. Jika tidak ikut arahannya, jadi juga keknya.. Cuma mungkin ianya sukar untuk kita melapis kek ini dan ianya pasti hancur... Jadi, lebih baik ikut arahan membuatnya ya.. ;) 


Untuk kek ini Diana menggunakan homemade Peanut Butter Cups.. Jika anda hendak menggunakan yang siap sedia, boleh belinya di kedai-kedai coklat ya.. Apa kata kita tengok dulu resipi untuk Peanut Butter Cups yang Diana ikut resipi dari blog fifteen spatulas.. Izinkan Diana kongsikannya di sini ya.. TQ

:: Resipi Oleh ~ fifteen spatulas  ( TQ )

HOMEMADE PEANUT BUTTER CUPS 


Yield: Makes 12-18 peanut butter cups ( depends on how thick you make the layers )
Ingredients
16 oz semisweet chocolate, chopped
1/2 cup creamy natural peanut butter
2 tbsp butter, softened
1.75 oz confectioner's sugar ( 1/4 cup + 2 tbsp ), sifted
Directions
  1. Line a standard 12 cup muffin tin with paper cupcake liners.
  2. Melt half the chocolate either in a double boiler ( the safer method ) or in the microwave ( the more dangerous, but easier/lazier method ). I opt for the latter. If you don't know how to melt chocolate this way, read my Explanation of Chocolate Behavior article.
  3. Distribute the melted chocolate into the 12 muffin tins ( I use a cookie scoop to portion the chocolate ), only barely filling the bottom of each cup. If the chocolate does not lie flat, drop the pan repeatedly on the counter, and it will flatten and smooth itself out. Place the pan in the freezer for 15 minutes.
  4. In the meantime, whip the peanut butter, butter, and confectioner's sugar together with a hand mixer until mixed and light. Taste it and make sure the sweetness is to your liking. Place small tablespoons of peanut butter into each cup, then drop the pan repeatedly on the counter again, so the peanut butter layer is flattened out. Place in the freezer for 15 minutes.
  5. Melt the last 1/2lb of chocolate, and portion small spoonfuls of chocolate into the cups, one cup at a time, immediately dropping the pan repeatedly on the counter to flatten each cup. In my experience of making these, the chill from the peanut butter ( because it was just in the freezer ) will harden up that top layer of chocolate very quickly, so you must flatten out the tops immediately after you pour the chocolate into each cup. Place the peanut butter cups in the freezer for 15 minutes to set the top layer of chocolate.
  6. You can either refrigerate them for a peanut butter cup with more bite, or leave them at room temperature for a softer, creamier bite. Just peel the wrapper off, and enjoy!


Lepas tu bolehlah kita sediakan Peanut Butter Cup Chocolate Cheesecake ya.. Jom tengok resipinya.. Resipi kek ini pula Diana ikut dari blog Sprinkle Bakes... Tetapi untuk kek coklatnya pula Diana ikut resipi dari Sweetapolita ( resipi sama seperti kek coklat di atas itu ).. Izinkan Diana kongsikannya di sini ya.. TQ..

:: Resipi Oleh ~ Sprinkle Bakes  ( TQ )

PEANUT BUTTER CUP CHOCOLATE CAKE  
Serves 15 - 20 at least  

Note: Plan ahead, this cake should be made over the course of 2-3 days.  Please read this recipe in its entirety before making. I have included lots of helpful notes throughout the text.

Edit:  Also, please note that this cheesecake should be stored in the freezer and is easier to cut when still partially frozen. 

Crustless Cheesecake portion
30 mini peanut butter cups, each one quartered
2 sticks ( 16 tbsp ) softened butter
1 cup granulated sugar
4- 8 oz packages cream cheese, softened
1- 3 oz. package cook and serve vanilla pudding
4 eggs
2 tsp baking powder
1 tbsp lemon juice
Instructions

Preheat oven to 325 degrees.  Grease two 9" pans with shortening, line the pans with parchment and then grease the parchment. Lightly flour the pans and tap out excess over the sink. Set aside.

Cream butter and sugar in a stand mixer fitted with paddle attachment. Add cream cheese a little at a time until smooth. Scrape bowl down and beat again on medium speed, adding eggs one at a time. Add remaining ingredients except peanut butter cups. Mix again until smooth.

With a rubber spatula, fold in quartered peanut butter cups. Divide batter evenly between pans.  You should have 8 cups of batter, so 4 cups in each pan. Smooth batter with offset spatula and bake for 55 minutes to 1 hour. Cheesecake will puff up during baking, then deflate when taken out.

Do not turn out cheesecakes when they are finished baking. Put them directly in the freezer, and leave until frozen solid.  

Turn out frozen cheesecake layers and peel parchment from the bottoms. Line the pan they were in with enough parchment or wax paper to hang over the sides of the pan. Place the cheesecakes back in the pans. This makes removal FAR more easy after caramel layer has been added. Place cheesecakes back into the freezer while you make the caramel layer.

Caramel for cake layers 
2-14 oz cans of sweetened condensed milk
10 tbsp. butter
80 caramels
Scant cup of salted peanut halves

Important note: This recipe is made in two batches, so all of the ingredients are divided.
Instructions

In a large microwaveable bowl, place 1- 14 oz. can sweetened condensed milk, 5 tbsp. butter, and 40 caramels. Heat at 1 minute intervals until smooth. My household microwave at full power took about 4 minutes.

Pour caramel evenly over frozen layers of cheesecakes. Be careful to not let much of the caramel drip over the sides. Sprinkle each layer with 3-4 tbsp. of salted peanut halves. Return cheesecake layers to freezer.


Chocolate cake portion

:: Resipi Oleh ~  Sweetapolita  ( TQ )

( Diana buat 2 kali ganda resipi di bawah ini untuk 2 layers )

Ingredients

For the Cake
1 stick ( 115 g ) unsalted butter, softened
1 1/3 cups ( 300 g ) packed dark brown sugar
2 teaspoons ( 10 ml ) pure vanilla extract 
2 eggs, at room temperature
1 cup + 2 tablespoons ( 145 g ) all-purpose flour

1/2 cup ( 60 g ) Dutch-process dark cocoa powder
3/4 teaspoon ( 4 g ) baking powder
3/4 teaspoon ( 6 g ) kosher salt
3/4 cup ( 180 ml ) buttermilk, shaken and warm
1/4 cup ( 60 ml ) coffee or espresso
3 tablespoons ( 45 ml ) mayonnaise
1/3 cup premium dark or extra dark chocolate chips
3/4 teaspoon baking soda
2 teaspoons ( 10 ml ) white vinegar


Instructions
  1. Preheat oven to 350°F. Butter two 9-inch round cake pans, line with parchment rounds, and dust with flour, tapping out the excess.
  2. In a stand mixer fitted with the paddle attachment, beat the butter, brown sugar and vanilla on medium-high speed until lighter in color and slightly increased in volume, about 5 minutes. Lower the speed to medium and add the eggs, one at a time, mixing until each is fully incorporated before adding the next.
  3. Sift the flour, cocoa powder and baking powder into a medium bowl. Add the salt to the dry ingredients after sifting, and whisk dry ingredients.
  4. In a small bowl or measuring cup, combine the coffee and buttermilk. Alternate dry ingredients and buttermilk mixture into creamed mixture, beginning and ending with dry ingredients. Mix until just incorporated, then fold mayonnaise into batter with a whisk, until just blended. Fold in chocolate chips. In a small bowl, combine the vinegar and baking soda ( it will foam ) and quickly add to batter, mixing until just combined.
  5. Divide the batter evenly between the prepared pans. Smooth with small offset palette knife, and bake for about 25 minutes, rotating once after 20 minutes. Cake is done when toothpick or skewer comes out clean. Try not to over-bake.
  6. Let pans cool on wire rack for 20 minutes, then invert cakes onto racks, gently, peeling away parchment rounds. Let cool completely.


Assemble The Cake

Line cake pans with parchment or wax paper, enough to hang over the edges ( just like previously with the cheesecake layers ).  Return cake layers to parchment lined pans.

Make 2nd batch of caramel as directed for the cheesecake layer. Pour caramel evenly over both chocolate cake layers, sprinkle with 3-4 tbsp. salted peanut halves. Place caramel covered cakes in freezer until caramel has hardened a bit  ( about 15 minutes ).

Remove all cake layers from freezer.  Remove all cake layers from pans using the parchment overhang to pull them out.  Stack layers beginning with 1 layer of chocolate cake as the bottom, then cheesecake layer, then chocolate layer, and last cheesecake layer will be on top. Wrap layers in plastic wrap and freeze overnight. You'll frost your cake the next day.

Chocolate ganache frosting
13 oz. or 1 2/3 cup semisweet chocolate chips
1 1/2 cups heavy cream
1/2 tbsp. corn syrup


Note: Remove cheesecake layers from freezer and unwrap.  Choose your serving plate and line it with wax paper strips.  Place cake over strips.  Now you're ready to frost.

Put chocolate chips in a medium bowl or 4 cup measure.  Heat cream in a saucepan over medium high heat until very hot but not boiling.  Pour hot cream over chips and stir until smooth.  Remove 2/3 cup chocolate mixture and pour into a small bowl.  Add 1/2 tbsp. corn syrup and stir.  When combined, immediately pour over top of cake, creating a shiny dark topping and taking care that most remains on top of the cake and doesn't spill down the edges .  Return cake, uncovered this time,  to freezer.

Fit stand mixer with whisk attachment.  Pour remaining chocolate ganache into the stand mixer bowl and whip on the highest speed for 5-10 minutes ( I set my timer for 7 minutes ) until icing is light and fluffy.  Icing is ready when it is thick and can be pulled into a stiff peak.

Remove cake layers from freezer and frost sides with chocolate ganache using an offset spatula.  The whipped frosting should grab on to the frozen cakes well. Use all the ganache frosting, evening the cake's surface as you work.


Chocolate curls ( Diana tidak buat )
1 1/2 cups chocolate chips -semisweet

Equipment 
11 x 14 cookie sheet 
Small brownie spatula with a sharp edge 

Melt chocolate chips at 30 second intervals in the microwave; stir until smooth. Pour onto cookie sheet and spread evenly with an offset spatula. Place in refrigerator for 5-7 minutes, or until the chocolate is firm and has a matte appearance.

Remove from refrigerator and let stand for a few minutes ( 3-5ish ) at room temperature.  With a small, sharp spatula, begin scraping chocolate at one edge in a thin strip.  If chocolate breaks into pieces it is too cold, so allow it to stand a few minutes more at room temp.  Chocolate should curl easily as you run your spatula under the chocolate and down the length of the cookie sheet.  Place curls in a small bowl and store in refrigerator until ready for use.

To garnish cake with chocolate curls, let cake stand at room temperature for a few minutes, then remove curls from refrigerator and gently press into the sides of the cake.


Peanut Butter Frosting and Garnish
2/3 cup creamy peanut butter
8 tbsp butter, softened
1 cup confectioners' sugar
9 mini peanut butter cups 

Cream peanut butter and butter together in stand mixer with whisk attachment. Gradually add powdered sugar.  Whip on high speed until light and fluffy.

Transfer icing to a piping bag fitted with a large french piping tip.  Pipe 8 large swirls around the top edge of cake, and pipe one swirl in the middle.  Garnish each swirl with a peanut butter cup.

Notes:

  • This cake should be sliced and served cold, not frozen.   ***Edit: I'm being told from some of you that it is easier to slice partially frozen.  Store in freezer.
  • Using the exact same pans for both cheesecakes and chocolate cakes will keep you from having to trim the edges when stacking all layers together.  ( I had to trim the cheesecake edges a little )
  • The caramel is very gooey and when cold can be a little resistant to slicing. Run a knife under hot water and dry it off, then cut the cake with the warm knife for a nice even slice.

:: Oleh kerana Diana menggunakan resipi kek coklat yang lain.. Jadi, sekiranya hendak menggunakan kek coklat dari resipi asal dan hendak tengok step by step dan bolehlah jenguk ke blog Sprinkle Bakes ya.. Cara dan resipinya ada di blog beliau ya.. Terima kasih.. :)


BACA SELANJUTNYA / READ MORE >>>

Wednesday, February 6, 2013

~ Brownie & Plum Trifles...

Sheery Dream Cakes | 4:11 PM | 9 Comments so far

Assalamualaikum dan Salam Sayang semua... 

Hari ini Diana nak kongsikan Brownie & Plum Trifles... Pada mulanya Diana tiada niat pun hendak ambil gambarnya.. Tapi di dalam tak sihat pagi tadi.. Ambil jugalah gambarnya main-main.. Hehehe.. Ermmm... Ambil gambar ini awal pagi lagi.. Masa yang memang belum lagi masa yang sesuai untuk mengambil gambar makanan... Cahaya yang terlalu terang pagi tadi tapi hentam juga ambil gambar.. Hahaa... Props untuk ambil gambar segala pun tidak dapat diambil sebab dapur tengah diubah suai sekarang ( lupa keluarkan dulu .. huhuuu ) Tu yang malas hendak ambil gambar buat masa ini.. Pakai apa yang ada sahaja lah nampaknya.. Tapi tidak apalah kan.. Diana kongsikannya jugalah di sini ya.. 

Resipinya pun main campak-campak sahaja.. :D.. Diana buat pun sebab hendak habiskan brownies tu... Jom tengok resipinya.. Atau lebih tepat kita sebut ianya sebagai idea untuk pencuci mulut kan.. ;). Ya lah dah resipi campak-campak gitu.. Jadi hanya untuk memberi idea sahajalah kan lebih tepat... Hihii...


:: Olahan Oleh ~ Sky Blue's Kitchen

BROWNIE & PLUM TRIFLES  

Bahan-Bahan
  • Sedikit Caramello brownies _ resipi rujuk di bawah ( The Baked Brownie )
  • Salted caramel secukupnya _ resipi rujuk di bawah
  • Fresh cream / Non-Dairy whipping cream _ dipukul hingga kental
  • Hirisan buah plum
  • Kacang pistachio _ ditumbuk

Cara-Cara
  1. Potong brownies kepada ketulan kecil dan ketepikan.
  2. Sediakan bekas yang sesuai dan masukkan sedikit fresh cream di dalamnya.
  3. Kemudian masukkan brownies dan tuangkan salted caramel di atasnya.
  4. Ulang langkah no. 2 dan 3. Buat sehingga bekas yang digunakan penuh. Taburkan dengan kacang pistachio tumbuk di atasnya.
  5. Sedia untuk dihidang.


THE BAKED BROWNIE  

:: Sumber ~ Brown Eyed Baker ( TQ )
:: Dulu Diana guna resipi ini untuk Ferrero Rocher Brownies 

INGREDIENTS

  • 1 1/4 cups all-purpose flour
  • 1 teaspoon salt
  • 2 tablespoons dark unsweetened cocoa powder
  • 11 ounces dark chocolate, coarsely chopped 
  • 1 cup ( 8 ounces ) unsalted butter, cut into 1-inch pieces
  • 1 teaspoon instant espresso powder 
  • 1 1/2 cups granulated sugar 
  • 1/2 cup packed light brown sugar
  • 5 eggs, at room temperature
  • 2 teaspoons vanilla extract

Method

  1. Preheat the oven to 350 degrees F. Butter the sides and bottom of a 9 x 13-inch glass or light-colored baking pan. Line the pan with parchment paper.
  2. In a medium bowl, whisk the flour, salt, and cocoa powder together.
  3. Put the chocolate, butter and instant espresso powder in a large bowl and set it over a saucepan of simmering water, stirring occasionally, until the chocolate and butter are completely melted and smooth. 
  4. Turn off the heat, but keep the bowl over the water and add the sugars. Whisk until completely combined, then remove the bowl from the pan. The mixture should be room temperature.
  5. Add 3 eggs to the chocolate mixture and whisk until combined. Add the remaining eggs and whisk until combined. 
  6. Add the vanilla and stir until combined. Do not overbeat the batter at this stage or your brownies will be cakey.
  7. Sprinkle the flour mixture over the chocolate mixture. Using a rubber spatula ( not a whisk ), fold the flour mixture into the chocolate until just a bit of the flour mixture is visible.
  8. Pour the batter into the prepared pan and smooth the top. Bake in the center of the oven for 30 minutes, rotating the pan halfway through the baking time, until a toothpick inserted into the center of the brownies comes out with a few moist crumbs sticking to it. 
  9. Let the brownies cool completely, then lift them out of the pan using the parchment paper. Cut into squares and serve.
  10. Store at room temperature in an airtight container or wrap with plastic wrap for up to 3 days.
( Recipe adapted from ~ Baked : New Frontiers in Baking 


SALTED CARAMEL  
:: Sumber dari ~  Manda @ Once Upon My Life  ( TQ )

INGREDIENTS

  • 1 cup sugar
  • 6 tablespoons salted butter cubed
  • 2/3 cup heavy cream, at room temperature _ Diana gantikannya dengan 1 tin kecil Nestle Cream ( Original ) 
Method
  1. Melt the sugar over medium high heat in a large pot. 
  2. Whisk the sugar as it melts and cook until it becomes a deep amber color. 
  3. Add the butter and stir it in until melted. 
  4. Pour in the heavy cream ( mixture will foam ) and whisk until you get a smooth sauce. You may have some lumps but keep stirring until they have melted. 
  5. Remove from heat and let cool. {I f you still have some lumps in the caramel after it has cooled - strain it through a fine mesh strainer }.  
  6. Store, covered, in the fridge. 

::  Letakkan coklat Caramello di atasnya sebelum membakar  ::


BACA SELANJUTNYA / READ MORE >>>